Mrs. Wheelbarrow's Kitchen has moved to a hosted WordPress blog!

You should be automatically redirected in 5 seconds.

If not, please visit http://www.mrswheelbarrow.com and remember to update your bookmarks
and sign up for her brand new RSS feed.

Tuesday, September 29, 2009

What's for Breakfast


Every week I make granola for Dennis. I like granola, too, but only in small doses. I sprinkle it on yogurt or grab a handful as I run out the door for a quick pick-me-up.

Dennis eats granola happily for breakfast, and often after dinner, as dessert. Me? For breakfast I want toast; for dessert I'd prefer chocolate. Or something with butter and cream.

It's taken a few years, but this recipe is a winner. I keep all the ingredients in the house so it can be thrown together in a few minutes. In fact, many mornings, I make this granola as coffee is brewing. Look for nuts, dried fruit and oats at Trader Joes or Costco. And feel free to make adjustments. Toasted sesame seeds are yummy. Coconut is a great addition. Dried cherries or currants or chopped up dried apricots are delicious. And changing up the maple syrup with honey makes for a totally different taste.

You see the bread next to the jar of granola? That's granola bread - a wonderful multigrain "healthy" loaf that's my breakfast of choice. I'll get that recipe up soon, but first, give this granola a try.


Nutty Fruity Granola

3 c old fashioned rolled oats (not instant)
1 c raw, slivered almonds
1/2 c raw, chopped pecans
1/2 c raw, chopped walnuts
1/4 c raw, unsalted pepitas
1/4 c raw, unsalted sunflower seeds
1/4 c olive oil, not extra virgin
1/4 c maple syrup
1 tsp cinnamon
1/2 tsp kosher salt
1 tsp vanilla
2 c golden raisins

Preheat the oven to 325
Line a sheet pan with parchment paper.
Mix together everything except the raisins and place the mixture on the sheet pan.
Bake for 20-25 min, checking carefully after 20, as it can turn from toasty to burnt quickly.
Mix in the raisins when the mixture is still warm from the oven. Let it cool completely.
Store in a big glass jar with a good seal to keep it super fresh. If it lasts that long!

Sunday, September 27, 2009

CanORama II


Last week, my friend, Eris, came by to make a batch of salsa - the last batch of the season. Eris and her husband, John, and brother in law, Jeff, run Norman's Farm Market, fantastic farmstands around the Washington, DC area. Their Market has been my source for a good bit of the locally grown produce that has been transformed into jarred goodies (not to mention the weekly CSA box that makes up a good portion of our nightly meals.)

All the produce at the Markets is sourced by John & Jeff, and their truck makes the rounds of the area around DC, the Eastern Shore of Maryland, the Northern Neck of Virginia, and central and southeastern Pennsylvania. The farms all use good sustainable practices, but don't promise organic. (I'll be learning more about the challenges of organic certification at Bending Bridge Farm next week.) Nevertheless, the breadth of offerings has been terrific. There were lovely heirloom tomatoes, fantastic varieties of peppers, amazing eggplant types, and, now, spectacular fall squashes of all shapes, colors and sizes.

I'm excited the Market may carry grass-fed meats this winter. Mostly, I wish all the Normans much success. It's so important to me to support local farmers, eat seasonally, and encourage sustainable practices. If you're in the area, please visit the Markets. And if you live here, consider the CSA - perhaps the best way to provide support to your local farmer.

Back to the salsa.


So, Eris is getting into canning this year. I know she made some jam, and some pickles. We've talked about sauerkraut, as John is a huge fan of kraut. But it's the salsa that really got her going. My salsa is good - seriously good - and she was determined to learn how to make it. We've had one other salsa-session this summer, but with October looming and the certain end of fresh tomatoes, it was time to put some more jars on the shelf.


Salsa requres a pressure canner (as do most tomato products, according to the USDA guidelines) and since I bought one last year, I've been enjoying the expanded list of items I can put up. (Not only tomatoes, but tuna and vegetables that aren't pickled! I'm hoping to try pork rillettes soon.) It's a big canner - holds 9 pints or 7 quarts - and that's a lot of produce to chop. It's great to share the work of chopping and offer half the production as an incentive! Seems fair, and somehow very traditional, sitting around the kitchen table chopping and measuring.

As Eris and I had done this before, everything went really smoothly this time. There's nothing like company to speed up the chopping, peeling, and deseeding of 12 cups of tomatoes. And lots of peppers, onions and garlic. After that, it's all babysitting. Stirring the big pot and waiting for the boil. And watching the pressure canner dial. So, there's plenty of time to hang in the kitchen and talk about life. That's when I start to feel like one of many women across the centuries who have gathered to preserve foods. I know. Really eye-rolling stuff there. But it does feel that way.

With the salsa planned, knowing the big pots would be up out of the basement, and it would be already hot and steamy and sticky in the kitchen, I decided to make a push and do one final CanORama for 2009.

There were five huge peaches I'd picked up the day before with my CSA box. And some organic strawberries from June that were taking up space in the freezer. And lemon verbena in the garden. Another batch of the peach/strawberry/verbena jam was in order; it's just heavenly in yogurt. So, I peeled, chopped and tossed everything with sugar and herbs and lemon juice, brought it all to a boil and then set it aside to marinate for a few hours.

The day before, while at the farm stand, the unmistakable scent of concord grapes was in the air. It was so intoxicating, I ordered a trug-full - 13 pounds - and started researching the best way to make juice. Grape juice is extremely healthy - full of antioxidants. It takes just a wash of the grapes, de-stemming and picking over, then a quick boil, a good smashing, another boil and straining, then a 5 minute boiling water bath and you have pints of grape juice on the shelf.


It was a little messy, and next time, I'll add more water and put it through a finer seive, as the end product is a bit thick. For this year, we'll thin the juice, once opened, with seltzer or water. It's very tasty and I look forward to doing more juice making next year. Now that I have the method, I see all sorts of options - blueberry juice? raspberry juice? How fantastic.


All this fancy canning is fun for me, but here's an easy recipe. You can make this jam using a boiling water bath. It's so delicious I'm sure you won't want to share it with anyone. But if you do, I'll bet you'll have a canning friend next year, too.


Peach Strawberry Lemon Verbena Jam
adapted from Christine Ferrer
Yields about six 1/2 pints

2.5# (1.14 kg) peaches, peeled, pitted and sliced (frozen can be used)
2# (.9 kg) strawberries, left whole (frozen can be used)
3.5 (875 gr) cups sugar
Juice of one lemon
10 stalks lemon verbena

Bring everything to a boil. Pour into a glass or ceramic bowl, cover with parchment paper and refrigerate at least six hours or overnight.

Bring jam back up to a boil and then simmer gently for 45 minutes. Return to a hard boil that cannot be stirred down. Allow to boil for 5 minutes.

Remove lemon verbena stems.

Pack into hot 1/2 pint jars, the more decorative the better. Wipe the rims and place rings and lids. Process in a boiling water bath for 10 minutes.

Lift the jars out of the bath and place on the counter. Leave them there, undisturbed for several hours. Listen to the satisfying ping of jars sealing.

Monday, September 21, 2009

New Beginnings


Today the website for Wooden Spoon Classes launched. It's very exciting. Click here to check it all out. I'm very pleased with the whole thing and thank Liz from Design291 for all her hard work.

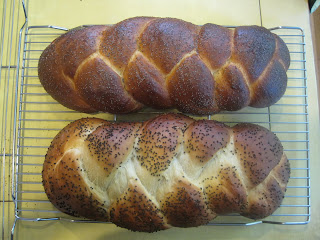
It's a new direction for Mrs. Wheelbarrow, and appropriately enough, just recently, we celebrated the Jewish New Year. In honor of the holiday, and new beginnings, I baked two loaves of challah. This was the first bread I ever taught myself to make, and after 20 some odd years of baking and braiding, I've gotten this recipe down to a science. It came from my great grandmother, Agatha, although I don't remember ever actually seeing her make it.

Challah is a traditional food for Sabbath dinners, and often for the New Year, it's braided form is presented as a round braided loaf to represented the circle of life. Isn't that nice? I've tried to make a braided circle and never could get it to work out. I think making bread is representative enough.


This seems like a good time to talk about flours. I've been experimenting in all my bread baking (including foccacia, pizza dough, and sandwich loaves) with two flours from King Arthur - the Artisan and the Sir Lancelot. I was curious to see if a change in flour was appreciable, since shipping it in goes against all my green leanings.

I am here to report - I really like the Artisan flour! It makes an exceptional crispy pizza crust. Better than regular King Arthur white flour? Well, yes. I'm glad I have an extra 3# bag in the pantry, and when I need another package of pre-cut parchment sheets (the very best thing in the baking world,) I'm sure I'll order another bag or two.

Not so much for the Sir Lancelot. The flour even felt light and fluffy to the touch, but the resulting dough was too light and there wasn't much of a crust. The blurb about the flour says it will make European style crusty breads and my experience was exactly the opposite.

But - back to the Challah. This is an eggy bread, so use nice fresh eggs. (I've made it with duck eggs and that is just amazingly yellow and rich!) This is a holiday bread, and the fact that it makes two loaves is the best part. That extra loaf in my freezer will be pulled out at Thanksgiving for sandwiches. Or New Year's Day bread pudding.

This recipe makes two very large loaves. I often slice it and freeze the slices. I've also made four small loaves. Start to finish, it's a five hour process. But there is plenty of down time. And you can always put the dough in the fridge to rise overnight, too.


Challah
makes two large loaves

Equipment
a stand mixer is really nice, but you can make these loaves by hand
a large rising bowl, oiled
bench scraper
two sheet pans, lined with parchment, brushed with oil and dusted with cornmeal

Sponge
2 tsp sugar
1 Tbls flour
1 c/ 8 oz warm water (110•F = hot from the faucet)
5 tsp yeast (two packages)

Warm a large bowl, or the bowl of your stand mixer by running hot water into it. Whisk all the sponge ingredients together. Cover the bowl with a clean dish towel and let it bubble away for about 10 minutes, while you get the rest of the ingredients together. (If, after 10 minutes, you don't have any foaming, your yeast may not be fresh. Start again with fresh yeast. Keep your yeast in the freezer if you don't use it frequently!)

Bread
1.5/12 oz c warm water
3 whole large eggs
2 egg large yolks
1/2 c/4 oz canola oil (or peanut)
1/2 c/95 gr Sugar
2 Tbls Kosher Salt
1/4 c/2oz light colored honey, I like to use clover, wildflower or apple blossom
7-8 c/700-800gr flour

Egg Wash
1 egg yolk
1 T sugar
poppy seeds (or my favorite, and what Agatha's recipe called for, charnushka seed from Penzeys)

If you are using the stand mixer, get the paddle attachment going at a nice slow pace, and add to the sponge, the eggs and egg yolks, the oil, sugar, salt and honey, and warm water. Scrape the bowl and add about 2.5 c of the flour and mix and scrape the bowl again. Mix for about five minutes at a medium speed.

Add four cups of flour. Stir it up with a wooden spoon or a spatula. Don't worry if it's all shaggy. Now, walk away from the dough. Take a 10 minute break. Check your email. Make a cup of tea. When you come back, the flour will have absorbed the liquid and it will be much easier to work with.

Switch to the dough hook. (Or roll up your sleeves.) Let the hook work on the dough for about 10 minutes. The dough will be nice and elastic, and will have a few little bubbles on the surface. It will be very soft.

Flour your counter lightly, turn out the dough and give it a little bit of a knead. Be gentle with it. Push it away, and use the bench scraper to lift and turn. It's a very delicate dough and the bread will have a better crumb if you use a light touch.

Tip the dough into the oiled bowl, cover it with a tea towel and let it rise in a warm place for 2 hours, or until doubled.

When it's all puffy and fabulous, gently deflate the dough (do not punch it down... that's not nice), and then let it rise again for 45 minutes.

Now it's time to braid your loaves. Tip the dough out of the bowl onto a lightly floured surface and divide into two parts. Then divide each half into three parts. Roll each part into a length about 12" long.

Line the three ropes up side by side. Start in the middle, braid to the end, then braid the other half. (here's a link to a way-too-long You Tube video showing you how.) Tuck the ends under and pinch them together. There are a number of other braids - a four-rope braid and a six-rope braid. I can just manage the three strand, but that's just me.

Carefully lift the loaf and place it on the sheet pan. Repeat with the second loaf.

Brush the loaves with the egg wash, . Sprinkle generously with the seeds. Let the loaves rise, uncovered, for about 30 minutes.

Preheat the oven to 375•F/190C.

Bake the loaves for 40 minutes, switching their positions halfway through. Check to make sure they're not browning too quickly, and if they are, tent with foil. When the loaf is finished, a thermometer inserted will measure an internal temp of 190.

Pull the loaves out of the oven and cool on a rack.

Thursday, September 17, 2009

My Favorite Dessert, At Least for Today


I love pound cake. It's so pure and simple. Pound cake is a wonder. You can make it on Sunday and it still tastes fresh and delicious on Thursday. You can warm it in the toaster and slather on a little jam. Have it a la mode. Cut a skinny little sliver and nibble it on one of those passing-through-the-kitchen moments. And it's likely you'll have everything you need to make it, once you've made it just once.

Pound cake got its name because of the original recipe - the one that called for a pound of butter, pound of eggs, pound of sugar and pound of flour. Which doesn't sound very good to me. For more scintillating information, here's a Wikipedia link.

In my mind, pound cake is heavenly and rich, but still somehow light. And in a good one, you can taste the quality of the butter, the freshness of the eggs, and it will give off such a good vanilla scent. If you're dieting, or feeling all righteous about fat and sugar, please don't read any further.


A few years ago, I bought a really nice heavy bundt pan at Sur La Table. This one is just perfect for pound cake. But if you don't have a heavy bundt pan, you can use a regular tube pan. Some people make pound cake in a loaf pan, but I like the outside crust too much.


I've tried many recipes, and my favorite is Miss Edna Lewis', but the directions provided in her collaborative book with Scott Peacock, The Gift of Southern Cooking, are what really helped me turn out a perfect cake every time.

PS Some of my friends across the pond have asked for metric measures. Here you go!

Miss Lewis' Yellow Pound Cake

8 oz excellent unsalted butter, cold, cut in 16 pieces
1-1/3 c (375 g) white sugar
pinch of salt
5 very very fresh large eggs
2c (220 g) flour, sifted
1 T (15 ml) vanilla extract
1 tsp lemon juice

Butter & flour the bundt pan.

Put the butter in the bowl of a mixer and beat on a low speed until it has softened somewhat and is spread around the bowl and has a waxy appearance. Add the sugar and beat on medium speed for 3-5 minutes, until it's fluffy. This can also be accomplished with a good wooden spoon, a bowl, and elbow grease.

Add eggs, one at a time, allowing each one to be completely incorporated before adding the next. After the third egg, add three tablespoons of the flour. This will keep the egg/butter/sugar mixture from separating. Now, add the fourth and fifth eggs, again completely incorporating one before the next is added.

Add the flour in three or four additions and mix until smooth. Do not overmix. (Don't you hate it when a recipe says that? It should look smooth. You can get the all the flour incorporated in the next step.)

Gently stir in the vanilla and lemon juice.

Spoon the batter in big blobs all around the pan. Spread it around with an offset spatula and then give it a light whack on the counter to get out any air bubbles.

Put the cake pan in a COLD oven. (And thank Miss Lewis for this smart idea.) Turn up the heat to 225•F/110•C and set the timer for 20 minutes. Then, raise the temperature to 300•F/150•C for another 20 minutes. Then to 325•F/160•C for the last 20-30 minutes. (Check after 20 minutes by inserting a pick into the cake, which will come out clean when the cake is done.)

Put the cake on a rack for about 5 minutes, then loosen it with a butter knife or offset spatula and turn the cake out onto a rack. Allow it to cool.

Store sliced pound cake in a tin lined in wax paper. It will keep at least 7 days - sometimes even 10.

Sunday, September 13, 2009

All Day Eggplant Parmesian


Got together with two girlfriends Friday night. We each talked about our lives as we hadn't gathered in awhile, but when I said "I spent the entire day making eggplant parmesian," they both laughed like crazy. How could it take an entire day to make eggplant parm?

Rather than defend myself at the time (wine does not make for good debate skills,) I have opted to write about my day in eggplant.

But let's go back two days earlier - when I baked two baguettes, planning to grind one or maybe both into bread crumbs. For the coating for the eggplant. Yeah. I know. You're rolling your eyes.

After breakfast, I cut up the stale bread and put it through the food processor and made about 8 cups of fluffy crumbs. Thought about toasting them and reprocessing. Thought about it.... didn't.

Went to the farm stand - found ten beautiful fairytale eggplant, about 1 lb. each. Then, to Whole Paycheck for local Blue Ridge fresh mozzerella. (Tried to get the mozz at the farm market, but they were sold out on three occasions!) Then to the Italian market for two huge chunks of excellent parmesian reggiano.

So, now it's 12:30 and I haven't had lunch. Stuck some almonds in my mouth and kept going.

Go out to the garden and pick about 4 lbs. of romas, a big bunch of parsley, and various basils - Genovese, pistou and even some purple. Get a million mosquito bites in the process.

Tossed the tomatoes in the big pan. Add to that, two bags of romas I froze as they ripened over the last three weeks. Start cooking the sauce. Chop all the herbs. Grate the cheese.


Get out the bowls, the sheet pans, the deep fryer. Slice the eggplant. Dredge, dip and coat. Fry each batch for 7-8 minutes. There were 12 batches. That's 84 minutes.

At the same time, keep stirring the sauce. Put it through a food mill. Saute onion & garlic, sauce back in the pan. Cook another hour.

Wash a lot of dishes. A lot. Wonder when to sneak in that shower.


Cover the counter with a large baking dish and several small au gratins, to make individual eggplant parms - our own TV dinners. Cripes, I'm not doing all this work for just one dinner. Get that assembly line going.

Write cooking instructions on the foil covering. Rearrange the entire freezer to find room.

And that's how it came to be 5:45pm on a Friday afternoon. I took a shower and met my friends at 6:30, after spending the entire day making eggplant parmesian.

Don't let this post discourage you. Put on some good music. Or, as I did, listen to the podcasts backed up on the IPod. This American Life provided many laughs today. This eggplant parmesian is stellar. Super tasty. A big hit everytime it's served. What could be better than a freezer-full of eggplant parmesian, all ready to pop in the oven?


Eggplant Parmesian

Makes one 9 x 13 baking dish. Serves 4.

These are more like eggplant stacks, but it's what we call Eggplant Parmesian in our house.

For the eggplant
4 or 5 - firm, medium eggplant, especially heirloom varieties like fairy tale or white queen
3 c breadcrumbs
1 c flour
12 large eggs
1 c freshly grated parmesian
1/2 c chopped Italian parsley
1/2 c chopped fresh basil
Salt & Pepper
1.5 qts. canola oil

For the sauce
10# fresh roma tomatoes (or three cans of whole tomatoes, drained and chopped)
3 Tbls olive oil
3 cloves garlic, minced
2 onions, diced
1/2 tsp crushed red pepper
4 oz tomato paste
1/2 c chopped fresh basil
Salt

For the stacks
1-2 balls of fresh mozzerella, sliced in 24 pieces

Slice the eggplant into rounds about 1" thick. Peeling is unnecessary.
Note: If the eggplant are very firm and fresh, salting is unnecessary. If the eggplant are a bit wrinkled, stack in a colander, salting between layers, and compress for about an hour.

Prepare three big bowls. Add flour, salt & pepper to the first bowl. Crack the eggs in the second bowl, add the cheese, and whisk until thick and incorporated. Toss the herbs and bread crumbs in the third bowl. Dredge the eggplant in the flour - pressing it in. Then dip in the eggs, then in the bread. Place the breaded eggplant on a sheet pan, lined with parchment paper. Repeat until one sheet pan is filled, then start frying.

Prepare another sheet pan by lining it with paper towels.

In a deep pan, heat canola oil to 360. Fry eggplant for 3-4 minutes per side. Allow the oil to come back to temperature between batches. Drain on paper towels.

In the meantime, make the sauce. Cut tomatoes in half, lengthwise. Put in a deep 5 qt covered pot on medium heat. Cover and simmer for 15 minutes, stirring halfway through. When the tomatoes have softened, put them through a food mill to remove skins and seeds.

Saute onion and garlic in olive oil in the same deep pot the tomatoes were in, and once wilted, add back the milled tomatoes, paste, crushed red pepper and salt to taste. Cook at a slow simmer for about an hour. Toss in the chopped basil for the last 10 minutes.

Ladle some sauce into the bottom of the baking dish. Place 12 pieces of eggplant in the dish, put a piece of mozzerella on top of each slice, sprinkle with parmesian, douse with sauce, and put another round of eggplant
around the pan, mozzerella on top of that, parm, sauce, and finally ending with a third round of eggplant and mozzerella on top (no sauce.) Cover with parchment paper, then with aluminum foil.

Place in a preheated 375 oven for about 30 minutes, remove the foil & parchment and cook five to ten more minutes to bubble up the mozzerella on top.

Let everything rest for about 10 min. before serving, to allow it to come together.

A New Grown Up Look

Welcome to my new blog look. It's so fresh and clean and so much better looking, don't you think?

Thanks go out to Elizabeth Hardy, designer extraordinaire, the brilliant owner of Design, 291. See her work here. Liz was inspirational. She not only made my site look better, but forced me to ask myself a lot of questions about what exactly it is I'm doing with this "food thing."

I still don't know - not entirely. Some of this reimagination or reinvention or whatever is certainly going to continue to evolve. But one thing is for sure - I really am going to launch the Wooden Spoon Classes, this Fall. I'll teach three recipes with each class, and focus on good practices and essential techniques. I should have the uber-cool one page website Liz designed to promote the classes - Wooden Spoon Classes - linked to the blog in just a few days.

I realize I'm a bit behind in posting, and will only say that, evidently, I needed my new look to get me writing. It's nice to be back.

My Own Can O Rama

Labor Day weekend was, for me, quite laborious. But worth it. Check out the larder.


About a week before, I read about the CanORama going on nationwide. Naturally, I read about it the day after it started. And that was a busy weekend for me - no really, I'm not making excuses. I thought it was a great idea, wondered if there was anyone I knew who would spend three days in a hot kitchen, realized there wasn't, and set forth on my own personal Can-O-Rama.

First, I foraged at the farmers markets and farm stand: wild and cultivated organic mushrooms, locally caught tuna, beautiful golden and deep red beets, the last of the white perfumed peaches, a few pounds of big yellow freestone peaches, the first of the deep purple ovoid plums -what I grew up calling prune plums, haricots verts and even some haricots jaunes, deep purply red highly flavored raspberries, plump garlic heads.

There were about 8 lbs. of romas from the garden (hallelujah, who woulda thunk?) and several bunches of Genovese basil.

I had my work cut out for me. And then a friend called to tell me her figs were ripe and she and her family had had enough, already, would I please come take some. So add to the pounds of food I planned to process, four picture perfect, utterly ripe pounds of brown turkey figs.

At the end of three days -
2 halfpints duxelles
6 halfpints tuna in olive oil
2 pint jars whole golden beets
2 pint jars whole harvard beets
4 pints frozen white peach raspberry puree
4 pints frozen sliced sugared yellow peaches
6 pint jars spicy asian plum sauce
6 pints frozen mixed yellow and green haricots, blanched
5 half pint jars raspberry chocolate jam
12 pints pesto, frozen
2 pints oven roasted tomato sauce, frozen
14 4-oz jars honeyed fig confiture with lemon and thyme

I was inspired in all this canning by Eugenia Bone's fine cookbook, Well Preserved. And Christine Ferber's Mes Confitures. And my own sense that summer is fading, and must be savored and tucked away for the winter ahead. It's been a great summer of canning, and I hope to do a bit more before turning over the garden and saying goodbye to my farmers market friends until Spring.

Here's the recipe for the fig confiture. It's all mine, with techniques derived from the masters.

Honeyed Fig Confiture with Lemon and Thyme

makes about 12 4oz jars, the perfect amount to set out with a chunk of great cheese. an exceptional gift if you can bear to part with it.

4 lbs. fresh figs

3 cups sugar

1 cup exceptional floral honey (clover, wildflower, apple blossom)

3 small organic lemons

6 sprigs of fresh thyme

Place the figs in a large bowl and pour boiling water over them to submerge. Allow them to sit for 10 minutes

Lift the figs out, stem and quarter them. Set aside.

Wash the lemons well and slice very thin with a mandoline or sharp knife.

In a preserving pan or other 5 qt or larger non-reactive pan, add figs, sugar, lemons, honey and thyme. Bring to a boil and keep boiling for ten minutes.

Pour off into a ceramic or glass bowl, cover with parchment, and refrigerate overnight.

The next day, bring the mixture back to a boil, reduce and simmer 45 minutes or longer, until it is aromatic and thickened.

Remove the thyme sprigs. Fill hot, sterilized jars with hot jam. Wipe the jars, place new lids and finger tighten the rings. Process in a boiling water bath for 10 minutes.

Tuesday, September 1, 2009

Life in Transition - and a Recipe


I haven't written much about Food52, and now seems like a good time. Because it's come at an interesting moment in my life.

Food52 is a fascinating concept - a website started by Amanda Hesser and Merrill Stubbs, that will seek out recipes from cooks around the country - some pros and some, like me, just enthusiastic home cooks - and collect them into a cookbook after 52 weeks. There are weekly contests (and anyone who knows me knows how I feel about a competition!) with great topics - best summer cocktail, best frozen dessert, and so on. It's lively and fun and I'm delighted to be part of the community. Learn more about Food52 here.

I've been participating for about a month. I've made at least a dozen of the posted recipes - liked some, loved others, shrugged off a couple. Commented. Voted. Been a member of the community. Last week was thrilling - I was actually selected as a finalist for my Plum Sauced Pork Tenderloin recipe. Totally amazing. It gave me great hope for this, the next stage in my life. My life in food.

For the last decade, it's been all about gardens, although I never stopped cooking. With the downturn in the economy, the landscape design biz has definitely fallen off, and I'm wondering whether there is something in this food thing I've been doing all my life. Something that will engage me.

This fall, I'm going to try holding some cooking classes, just to see how I like it, and whether anyone will come. And I'll just keep blogging (and wondering if anyone is reading) and entering recipes at Food52. Wish me luck. I'm older than the last time I reinvented myself and I'm hoping it's still possible.

Here's the recipe I entered in the Best Eggplant Recipe contest.

Swearing Like A Sailor Stuffed Eggplant


The eggplant are first boiled, then stuffed with rice, toasted nuts, currants, herbs and cheese, then quickly sauteed (that's where the swearing comes in), and then baked in a rich tomato sauce. I've frozen this very successfully, pre-baking, both in individual serving dishes and as a large casserole. It makes a great dish for a crowd and I've served it at Thanksgiving, as it's a little something different from the regular eggplant parm that is a buffet staple for vegetarians. Without the cheese, it's a vegan dish. The technique for this recipe first appeared in Gourmet magazine.

Serves 6, but doubles or triples easily

Stuffed Eggplant:
  • 6 smallish eggplant - I prefer the white round types, or the paler purple oblong variety
  • 1.5 cups cooked rice (white, brown, basmati, leftover Chinese takeout all work)
  • 2 eggs, lightly beaten
  • 1 cup freshly grated parmesian
  • .5 cups toasted pine nuts
  • .5 cups currants, plumped
  • 1/2 cup toasted bread crumbs
  • 1/4 cup mixed fresh herbs - basil & parsley & chervil work nicely
  • fresh or dried thyme and oregano
  • salt & pepper
  • canola oil
Tomato Sauce:
  • 2 quarts whole tomatoes, drained and rough chopped
  • 3 garlic cloves, sliced
  • 1/3-1/2 cup olive oil
  1. Pierce eggplant all over with a fork.
  2. Bring a large pot of salted water to a boil, add eggplant and boil for 20-30 minutes, depending on their size, or until fork tender. Remove from the water and cool slightly.
  3. When cool enough to handle, slice eggplant in half lengthwise, preserving the skin (and half the stem on each half, if possible.) This is a good time to start swearing.
  4. Scoop out the flesh of the eggplant, rough chop, and put it in a large bowl. Continue swearing a blue streak. They're unbelievably hot and the skin splits. Don't worry. You'll be able to fix this.
  5. Add the rest of the ingredients to the eggplant and stir well. Taste and correct for seasoning.
  6. Scooping some of the mixture in your hand, (really - use your hands) form it into a large egg shape and stuff the eggplant skins, piecing them together as necessary. Place them on a parchment lined sheet pan as you complete them.


  7. Heat 1.5"-2" of canola oil in a deep saute pan. I use a cast iron pan. Send the kids out of the room. This is when the swearing really starts.
  8. When the oil is hot, place two or three halves in the oil, skin side down. Cook for 2-3 minutes. Using two slotted spoons or a slotted spoon and a spatula, turn the whole blasted thing over without losing the stuffing. Yes, seriously. Cook another 2-3 minutes, until browned on the stuffing side. Remove to a rack lined with paper towels, stuffing side up.

  9. When you have successfully browned all the eggplant, have a glass of wine. Really, that was a huge pain, wasn't it? Don't worry. It's worth it.
  10. Preheat the oven to 375
  11. Now, make the sauce. Heat the oil in a medium saucepan, add the garlic until starting to turn golden, then add the tomatoes, some salt and pepper, and cook for 20-25 minutes until it's good and saucy. (You can also use fresh tomatoes - about 5 lbs., peeled and chopped.)
  12. Either use individual serving dishes large enough to hold two eggplant or a large rectangular baker. Pour the sauce in the bottom of the baking dish and place eggplant on top of the sauce. Cover with foil.
  13. Bake 30 minutes, or until the sauce is bubbly.
  14. Take a deep breath. Stop your swearing. Serve and enjoy.